I thought that I should give some background about our property. Where we started, what we've done and what we're working to.
It all began in December of 2005 when we bought our house. We found a house with just under 1 1/2 acres of land. We picked this house for several reasons. The house was big enough for all of our children, the kitchen was large enough to be able comfortably cook in, the house had lots of space between the other houses and it was far enough outside of the city to get some quiet and see the stars.
When we first bought our house the majority of the land was covered in weeds topping out at about 8 feet tall. We didn't think it would be to difficult to cut down and clear the weeds, boy were we wrong. It turns out that in the time the house was empty the land had been used as a dumping site. Piles and piles of trash had been dumped all over the property and covered in dirt. The weeds grew over the top of them and hid the piles of trash. So when I started cutting down the weeds let me tell you about my shock.
So the first thing was to cut down all weeds and find out just how much trash there was. Once we realized that we had about an acre covered with 3-4 foot tall trash piles it was time to get a trash dumpster. It took us almost a year having the dumpster emptied twice a week to finally remove all of the trash.
Once all of the trash was removed we found disease and termite ridden mesquite trees and bushes all over the property and smashed remnants of a fence. We eventually removed all of the trees over the course of several years to finally get down to clean soil. We're still, 7 years later removing pieces of glass and metal we find buried in the dirt, but we're finally to a point of building things up.
We built a fence around the property. I built the fence using reclaimed steel fence posts for the upright posts and 1/2 rebar for the top rail. I did this because I was able to buy the reclaimed posts for $3.00 US a piece instead of $9.00 US a piece. Plus by using the rebar for the top rail I was able to buy 20 feet for $5.00 US instead of the top rail tubing for $13.00 US per 10 foot section. This all added up to a huge cost saving for us. I welded the top rails together and the rails to the top of the posts. By welding it all I did away with the extra cost for all the extra connectors. I also built all of the gates from scratch instead of buying prebuilt gates. By doing all of this ourselves it cost us about $1,500.00 US for the entire fence. This was a significant savings over the $12,000.00 quotes I got from the fence companies. If you check salvage yards you can get great deals.
We also dug ditches and laid out irrigation lines around the perimeter of the front half of the property. I used the irrigation to water the trees I planted. I planted 11 pine trees, 2 mulberry trees, 2 apricot trees, 2 peach trees, 3 apple trees, 2 plum trees, 1 grapefruit tree, 1 lemon tree and 3 orange trees. Here in the Arizona desert the underground irrigation works really well for the trees and saves lots of water. We still have the back length of the fence line to plant with trees and put in irrigation.
We've also begun working on digging an underground cistern. The plan for the cistern is to use it as a rainwater and gray water collection system. I plan on re-plumbing the sinks, tubes and showers so the gray water is diverted to the cistern. Then pressurize the water to use for the irrigation and toilet tanks. This would allow us to use the water that we pay for twice and use less water. Once the cistern is completed I'm going to build a green house and my garden oven the top of it.
We're in the process of building our outdoor earth kitchen. The entire kitchen design is based around wood fired cooking. Since wood fired cooking is carbon neutral and just tastes so good this is my preferred cooking method. This outdoor kitchen also allows us to cook in the summer heat without adding more heat into the house. I dedicated my blog Earth Kitchen Project to the chronicling of building the outdoor kitchen.
I plan on building a chicken coop and smoke house in the back of the property as well as a shed and root cellar. I also have plans to build a workshop to give me a place to setup my tools permanently and work on my blacksmithing.
My plans also include building and installing alternative energy systems. I want to have a solar water heater, solar and wind power generators. I want to build a solar heating system for the hot tub. Maybe even research a viable alternative cooling system for the house. We also might build an outdoor shower and maybe even a small guest house. Overall our plans are to be as self sufficient as possible. I will continue posting pictures and information on all of our projects so that we may help in answering peoples questions or maybe even inspire them to try some of this on their own.
Showing posts with label Homesteading. Show all posts
Showing posts with label Homesteading. Show all posts
Friday, February 8, 2013

Thursday, January 31, 2013
My Flag Pole . . . Third Time Is The Charm
Ok if you read my post about my antenna tower than you know about the storms that we get here in the Arizona desert. If you haven't read the post then I'll give quick explanation. We have severe wind storms, sand storms and monsoon storms. Since we have lived here at least twice the winds have reached speeds of 125 miles per hour. This tends to damage things sticking up in the air.


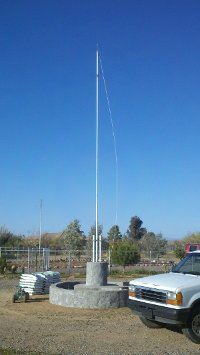


After we bought our house I had to take out the tree in the middle of the circular driveway. I turned out to be diseased ad there was nothing that we could do for it. So I suddenly had this hole and I had the perfect place for a flag pole. I wanted to put one up on the property somewhere anyways so I thought this worked out perfect. I went out and started flag pole shopping. I found an aluminum segmented pole that was rated for 125 mile per hour winds. It was 20 foot tall and came with a 2 foot sleeve to concrete into the ground in order to mount the pole into. So I concreted the sleeve in the ground and installed the pole. It was a nice 18 foot pole and everything was good. Well we had a storm and the winds hit 75 miles per hour (which was 50 miles per hour less than it was rated) and the flag pole bent severely. I called the company and they sent me replacement segments and suggested that I add a raised concrete pedestal to the pole and add cement inside the bottom section or two of the pole. So this is what I did but, when we had the storm that took out the antenna mast the last time with winds hitting 125 miles an hour the flag pole was just snapped off like small tree. My son and I were outside tying things down when we heard this loud crack and the flag pole came crashing down. So scratch flag pole number 2.
After a couple of years with my broken flag pole just sitting there we inherited a flag pole from my in laws since the were moving. This was a nice and heavy overbuilt steel flag pole. We also got a lot of blocks, pavers, stepping stones, edging, brick and more. Not a lot of any one thing but, a lot in total. So I decided that I couldn't possibly leave the pole on the ground so here come flag pole number 3.
I figured that if I was going to build flag pole number 3 that I wanted it to be solid without a worry of it coming down like the previous 2 poles. I also had always planned for an herb garden around the flag pole and I had already ran and irrigation line so I figured now was the time to put it in.
So I started with the existing pedestal and added 2 up right stabilizing supports and I welded support braces to the up rights and wrapped flat steel under tension to lock the up rights in place. I also added anchors to lock everything inside the concrete. On top of the pedestal in between the uprights I welded a support system for the mounting plate that I made. I also measured and spaced out the blocks for the herb garden.
Once that was done I measured and stacked up the blocks to make the stairs and setup a form for the concrete base.
Before I started filling the form with concrete I started filling some inner space with the broken pavers, bricks and edging. I also added more as I was putting in more concrete. I wanted to use what I had so I could add weight and structure without having to buy more concrete. I then setup the form for the larger pedestal to concrete the rest of the support and anchors for the up rights. My form was a little short so I had to concrete most of the pedestal then come back the next day and move the form to finish.
Next I dug and leveled a small trench for the first course of blocks for the herb garden. Then I stacked the next 2 courses and tweaked them to smooth out the circle. Next I cut up some old T-posts and hammered them down inside each hole in the blocks except for the 8 holes where I plan to put my solar lights. I used 1/2 inch rebar for those holes. The rebar was measured so that I had plenty of length to mount the solar lights on.
After I removed all of the forms I started mixing earthen concrete. That's a mixture of clay subsoil with the concrete. It takes longer to dry but, dries as hard as concrete and is a more green solution than straight concrete. The trick that I learned was not to add more the 45% by volume of the clay to the concrete. This works great for the fill and locked the wall together great but, I haven't tried to use the earthen mix with anything that was load bearing. I've read that you can but, I've had yet o try it.
Then I used the earthen mix to fill in all the gaps and start to smooth out the sides and top of the wall and stairs. I also used it inside of the wall if there was any gaps and to close up and on the bottom sides of the stairs to fill everything in and shore things up.
Next I mixed and applied stucco to the outside wall and pedestal and smoothed out the stairs, base and top of the pedestal. I had some fun with the stucco since I like the rough finish rather than a very smooth finish. It took me a few days to get it all done.
I finally got all of the stucco on and leveled out. I also had to come back a couple of times to fill in the cracks that developed. I also had to come back and fill in and the front and sides of the bottom step.
So with the stucco done it was time to put up the flag pole in order to mark and fit the cross member / pivot that I designed in to the flag pole. The purpose of the cross member is to act as a stiffening support so that stress on the pole gets transferred through the up rights as well as the bottom of the pole. The second purpose for the bar is as a pivot. I did this so if anything has to be repaired the pole can be lowered and raised again without having to lift it by hand like we did for the fitting of the bar. All I can say is that I'm proud of my boys, since it took 3 of them working with me to get the pole up and in place. Then it took all 4 of us to take the pole back down so I could finish up the work on the pole, get it painted and install the weather vain.
Next I welded 2 short pipes on the on the pole over the holes I made for the cross member bar. I did this to add strength around the holes and give the pivot point more strength. After cleaning up the welds and making finishing the holes on the butt plate I sanded then primered the pole with a self etching primer then painted the pole with a gloss white paint. Then I installed and adjusted the weather vain. Next I added the pulley at the top of the pole and the cleat at the bottom of the pole. Once the rope was added the pole was ready to mount.
My boys helped me again to mount the the pole. Once the pole was mounted I added the clips to the rope so I could test hang the flags. While the pole was down I also primered and painted the cross member bar, uprights and exposed mounting plate.
Next I painted the exposed surfaces. However I didn't want to use regular paint so I made some lime wash and added some solid colorant like what is used for colored cement. I mixed it well and painted it on. I applied 2 coats over everything and a few spots needed 3 coats. I used the lime wash because once it bonds with the cement the color is permanent and does not rub off. If any cracks develop they can be filled with some lime putty and painted over with another coat of the colored lime wash and everything will continue to bond together and get stronger over time without chemicals or solvents.
The last things were to add the weed barrier, run the irrigation to manifolds for the soaker lines, back fill with a composted growing soil, and plant some herbs. I also installed my solar lights. I'm happy with how this came out. Since we finished building this flag pole and planter it has weathered several extreme storms without any issue.
I also forgot to point out that the pivot is designed to lower the pole towards the front gate opening as you can see from this picture. This was done to make it easier to clear everything when it is necessary to lower it down.
Just a quick not about the planter. This has been wonderful and extremely productive all year round and really adds to the aesthetic appeal of the flag pole. I cook with the herbs, onions, leaks and garlic from this planter almost daily. It's been wonderful.
No More Antenna Problems
I thought I would post this just in case other people have had similar problems or maybe give someone an idea.
First off let me explain why I'm using an antenna. Where we live we can't get cable and satellite tv is just ridiculously expense so we opt to use an antenna for basic over the air broadcasts. Since that and netflix are our only entertainment we do try to keep it up and working.
Ok all about why and how we built the tower. Here in the Arizona desert we get lots of high wind storms. Most of the time it's ok but, at least once a year we get a nasty one with extremely high winds that always seems to damage something. In my case the antenna mast was damaged every year and twice one year. So in the first 3 years of owning our house the antenna mast was damaged 4 times. Well let me tell you that is a real pain in the butt to have to keep fixing. So when the mast was damaged a 5th time I said enough was enough and starting looking into how to never have this problem again. The answer I came up with was a nice sturdy radio tower. The way the radio towers are built the are very sturdy and hold up to the wind well.
First thing I did was to start looking for used towers but, the cheap ones were $75-$100 dollars US per 10 foot section. Well that wasn't going to work for me. So back to the drawing board. So I looked at the antenna mast and found that it was a single thin walled pipe. in doing some comparisons I found that I could get a slightly larger diameter and thicker walled galvanized pipe in 10 foot 6 inch section from my local Home Depot. I also found 20 foot long 1/2 thick rebar cheap there are well. So I suddenly had the idea to build my own radio tower. I did some quick math and figured I would need 10 pipes and 5 pieces of rebar.
 I cut the rebar into 1 foot segments then measured out and marked the locations were all of the rebar went. I then used 3 pipes to make 1 10 foot section. I repeated the 2 more time to make 3 sections total.
On the top section I added a mast to be able to mount the antenna on. I made sure that the mast was solid and well supported to avoid as much vibration as possible.
Once all three sections were completed we lined them up and slipped the ends of one into the ends of the other pipe sections. Each pipe had a 6 inch section that was pressed down to fit inside the other end of the pipe. This worked out really well. We put them together, leveled them out and welded them. I decided the I didn't want them to come apart in order to give the tower a little more rigidity.
Once all of the sections were leveled and welded we we were ready to put the tower up. At this point I had to get 4 more pipes to make the braces I used to mount and stabilize the tower to the house. I also bought 8 bags of concrete for the base foundation.
We dug the foundation hole 3 feet deep and 3 feet in diameter. My boys and a friend all helped to pick up and move the tower and place the end into the foundation hole.
 The 5 of us then started to walk the tower up. This was a bit of a challenge but, we got it standing. Once the tower was up we gad to put the braces in place. I had to have the boys move the welder onto the roof so that I could weld the braces on to the tower after mounting them to the house.
We then took some broken pieces of concrete and placed them in the hole and ran some rebar in the hole to add an extra anchor. We then poured in the concrete and added some more broken concrete. Then troweled the top so the center was raised to expel any water. We also had the boys put their hand prints and the year in.
After letting the concrete set I installed the antenna on top and then ran conduit along one of the braces for electrical wiring and mounted a light about 20 feet up.
In total the tip of the tower now sits at 32 feet. This allowed me to now mount the antenna at about 31 feet. Which was about 16 feet higher than the old mast. This new height has really improved our reception and the amount of channels that we receive.
You can see one of my sons in the second picture having climbed almost to the top of the tower. It is very stable and hardly shakes or moves. About 2 months after the tower went up we had a storm with gust pushing 125 miles per hour and the tower held like a champ. However the winds snapped my flagpole in the front yard like it was a twig. Since the installation of the tower it has held without issue with every sand storm, wind storm and monsoon.
The one thing that I should note is that I did ground the tower. I put in an 8 foot grounding stake several feet away and ran 4 heavy 6 gauge wires from the tower to the grounding stake. I also ran a separate ground from the coaxial cable connector down to the grounding stake as well just as an extra precaution.
All in all I spent about $100 US to build the tower. If you ask me it was money well spent given that I don't have to fix it anymore, we get better reception and more channels. The lights works well enough to light up the east side of our property. I have also thought about the possibility of mounting wind mills on a tower like this. We'll just have to see what other people come up with.
First off let me explain why I'm using an antenna. Where we live we can't get cable and satellite tv is just ridiculously expense so we opt to use an antenna for basic over the air broadcasts. Since that and netflix are our only entertainment we do try to keep it up and working.
Ok all about why and how we built the tower. Here in the Arizona desert we get lots of high wind storms. Most of the time it's ok but, at least once a year we get a nasty one with extremely high winds that always seems to damage something. In my case the antenna mast was damaged every year and twice one year. So in the first 3 years of owning our house the antenna mast was damaged 4 times. Well let me tell you that is a real pain in the butt to have to keep fixing. So when the mast was damaged a 5th time I said enough was enough and starting looking into how to never have this problem again. The answer I came up with was a nice sturdy radio tower. The way the radio towers are built the are very sturdy and hold up to the wind well.
First thing I did was to start looking for used towers but, the cheap ones were $75-$100 dollars US per 10 foot section. Well that wasn't going to work for me. So back to the drawing board. So I looked at the antenna mast and found that it was a single thin walled pipe. in doing some comparisons I found that I could get a slightly larger diameter and thicker walled galvanized pipe in 10 foot 6 inch section from my local Home Depot. I also found 20 foot long 1/2 thick rebar cheap there are well. So I suddenly had the idea to build my own radio tower. I did some quick math and figured I would need 10 pipes and 5 pieces of rebar.
On the top section I added a mast to be able to mount the antenna on. I made sure that the mast was solid and well supported to avoid as much vibration as possible.
Once all three sections were completed we lined them up and slipped the ends of one into the ends of the other pipe sections. Each pipe had a 6 inch section that was pressed down to fit inside the other end of the pipe. This worked out really well. We put them together, leveled them out and welded them. I decided the I didn't want them to come apart in order to give the tower a little more rigidity.
Once all of the sections were leveled and welded we we were ready to put the tower up. At this point I had to get 4 more pipes to make the braces I used to mount and stabilize the tower to the house. I also bought 8 bags of concrete for the base foundation.
We dug the foundation hole 3 feet deep and 3 feet in diameter. My boys and a friend all helped to pick up and move the tower and place the end into the foundation hole.
The 5 of us then started to walk the tower up. This was a bit of a challenge but, we got it standing. Once the tower was up we gad to put the braces in place. I had to have the boys move the welder onto the roof so that I could weld the braces on to the tower after mounting them to the house.We then took some broken pieces of concrete and placed them in the hole and ran some rebar in the hole to add an extra anchor. We then poured in the concrete and added some more broken concrete. Then troweled the top so the center was raised to expel any water. We also had the boys put their hand prints and the year in.
After letting the concrete set I installed the antenna on top and then ran conduit along one of the braces for electrical wiring and mounted a light about 20 feet up.
In total the tip of the tower now sits at 32 feet. This allowed me to now mount the antenna at about 31 feet. Which was about 16 feet higher than the old mast. This new height has really improved our reception and the amount of channels that we receive.
You can see one of my sons in the second picture having climbed almost to the top of the tower. It is very stable and hardly shakes or moves. About 2 months after the tower went up we had a storm with gust pushing 125 miles per hour and the tower held like a champ. However the winds snapped my flagpole in the front yard like it was a twig. Since the installation of the tower it has held without issue with every sand storm, wind storm and monsoon.
The one thing that I should note is that I did ground the tower. I put in an 8 foot grounding stake several feet away and ran 4 heavy 6 gauge wires from the tower to the grounding stake. I also ran a separate ground from the coaxial cable connector down to the grounding stake as well just as an extra precaution.
All in all I spent about $100 US to build the tower. If you ask me it was money well spent given that I don't have to fix it anymore, we get better reception and more channels. The lights works well enough to light up the east side of our property. I have also thought about the possibility of mounting wind mills on a tower like this. We'll just have to see what other people come up with.
Subscribe to:
Posts (Atom)